Want instant SMS alerts from your ESP32 without relying on a bulky GSM module? Whether it's motion detection, a sudden temperature spike, or an unauthorized locker door opening, your ESP32 can now send real-time SMS notifications straight to your phone, using just Wi-Fi and a free API from Circuit Digest Cloud.
Most IoT projects require you to constantly check an app or web dashboard to stay updated. But with this smart SMS-based alert system, your ESP32 becomes a proactive watchdog, pushing important updates directly to your smartphone inbox, even when you're offline from apps or dashboards. And the best part? No monthly fees, no SIM cards, just code and Wi-Fi.
In this article, we are going to show you how you can read the temperature data from a DHT11 and send the values to a smartphone as an SMS using the ESP32 board. So let's get started.
Table of Contents
How does it send SMS without using GSM?
Instead of making ESP32 directly rely on cellular networks, we connect ESP32 to the Wi-Fi network and make use of the Circuit Digest SMS API to send text messages. These SMS APIs act as a middleman between ESP32 and the cellular networks. Here's how it works:

ESP32 connects to the Active Wi-Fi Network - ESP32 connects to the Wi-Fi Access point to access the internet, so that it is able to communicate with SMS API’s.
ESP32 sends HTTP request to the API - Whenever ESP32 gets triggered by the Sensors, it sends an HTTP request to the SMS API with the recipient’s phone number, message and valid API Key.
SMS API delivers the Message - SMS API checks if the API Key is valid or not. If it is valid, then it sends a message to the recipient’s phone number through the mobile network, just like a regular text message.
In this way, we can send SMS using ESP32 without the need for GSM Modules. If you're curious about how to send SMS using GSM, then check out this guide to send SMS from ESP32 using GSM.
Ok, that’s all about it working. Let’s move to components that are required to send SMS Alerts from ESP32 via the Internet.
Components Required
The hardware requirements for making ESP32 send SMS are minimal. Here are the things that you need to make one.
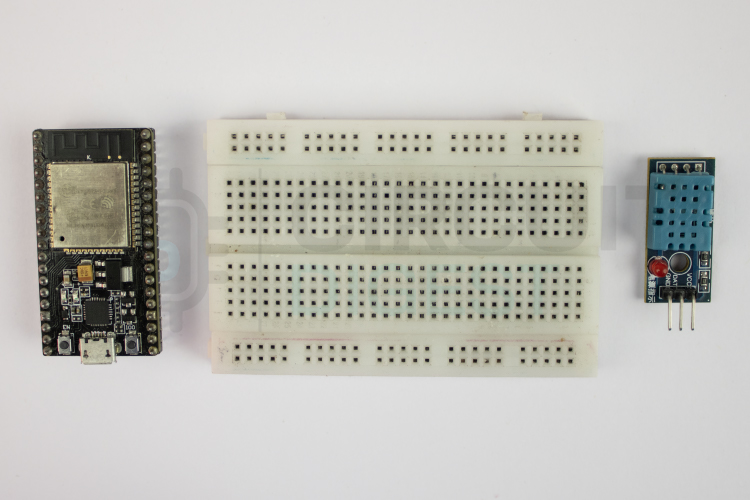
ESP32 Development Board
DHT11 Sensor
Breadboard
5V Power Supply Adaptor with programming cable.
Connecting Wires
For a practical example, I make use of a DHT11 sensor to measure temperature and make the ESP32 send SMS alerts if a certain condition occurs.
Based on your application, you can use any sensor as you want in place of the DHT11 sensor. For example, if you want to trigger an SMS alert when motion is detected, then you might opt for a PIR Sensor by utilizing this ESP32 PIR Sensor Interfacing tutorial as a reference.
Circuit Diagram
Setting up the hardware for sending SMS with the ESP32 is Simple. Since we are using the Online SMS API’s, we don’t need to worry about the complex GSM circuit connection. Here is a circuit diagram for our ESP32 SMS Sender.

Hardware Setup
Here is the actual hardware of the ESP32 SMS sending Circuit. Looks simple, right? Yeah, because it doesn’t need any additional hardware like GSM. To send an SMS, it just needs a Power of the Internet.
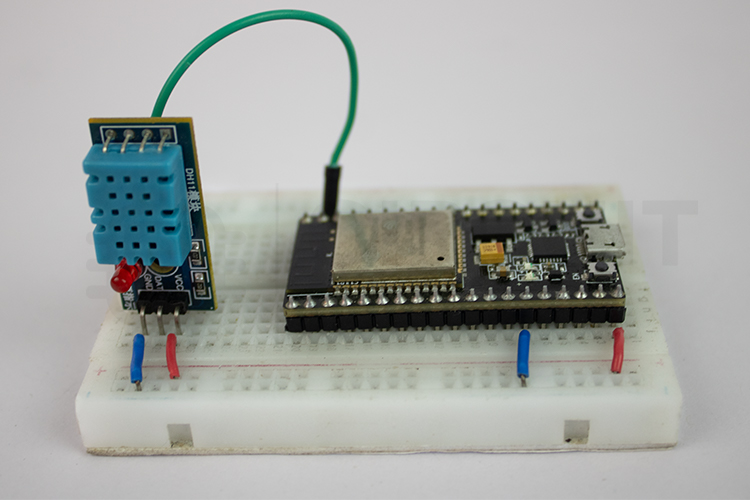
You can use a 5V power supply to power this whole circuit through the ESP32’s USB Port. Next we will see how to generate an API key for SMS transmission.

Generating API Key
Before moving on to the coding part, we first want to generate a valid SMS API from the Circuit Digest Cloud SMS service provider, so that we can make our ESP32 send SMS by utilizing the power of the internet.
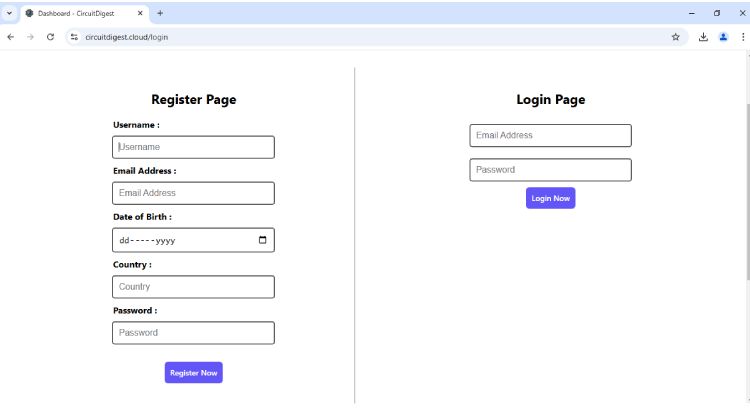
STEP 1: Visit our Circuit Digest Cloud website “https://www.circuitdigest.cloud/”. Then click on the login button. It will redirect you to the login page, there you just enter your login credentials. If you don’t have an account, create a new one using the Register Page.
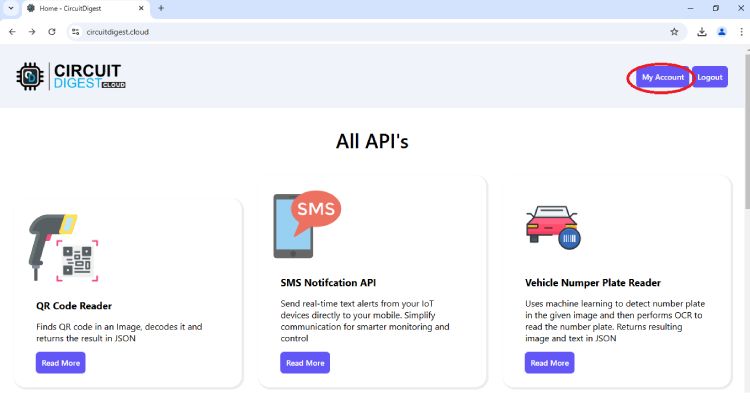
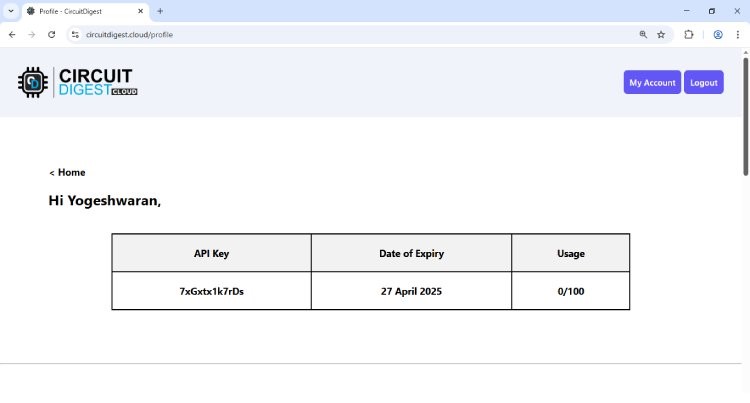
STEP 2: After logging in, you will find the “My Account” button in the top right corner. Click on it, it will redirect you to the API Key generating page.
STEP 3: On the API Key generating page, you will be asked to fill out the captcha. After completion of the captcha verification, a new API key will be generated with a limit of 100 SMS per month. Even after Expiry, you can renew it for free of cost.
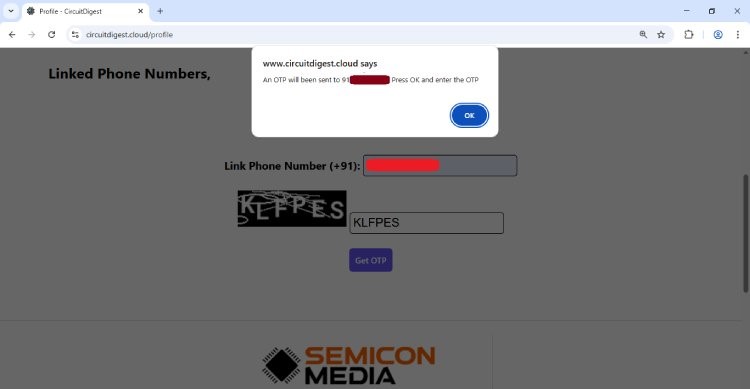
STEP 4: After that, just scroll down the webpage. There, it will ask you to link the recipient's mobile number for sending an SMS alert, followed by captcha and OTP verification. Here you can link more than one recipient’s mobile number to get SMS alerts.
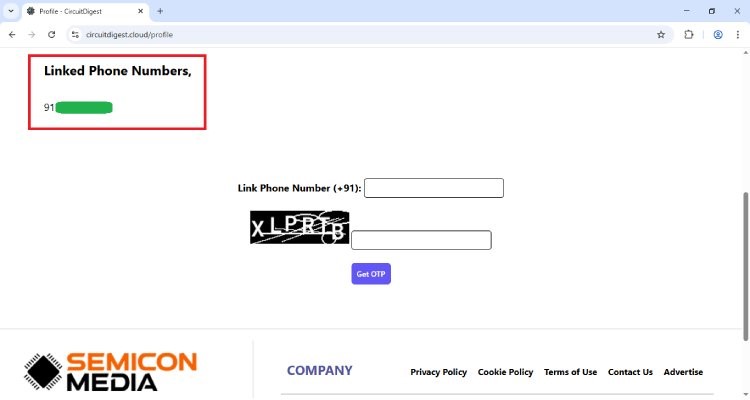
STEP 5: After linking all your recipient mobile numbers, you will be able to verify the list of linked phone numbers as shown in the image below.
Prebuilt SMS Template of Circuit Digest Cloud
Previously, I taught you how to generate the SMS API Key from Circuit Digest Cloud for sending SMS from ESP32. Now, here we are going to know about predefined SMS templates and how to choose one that suits our specific application.
Here you find the list of SMS templates, where each of them is designed for a specific alert use case. Since I am using a DHT11 sensor to trigger an SMS Alert based on temperature threshold value, I going to pick out “Temperature Alert Template with ID of 102”.
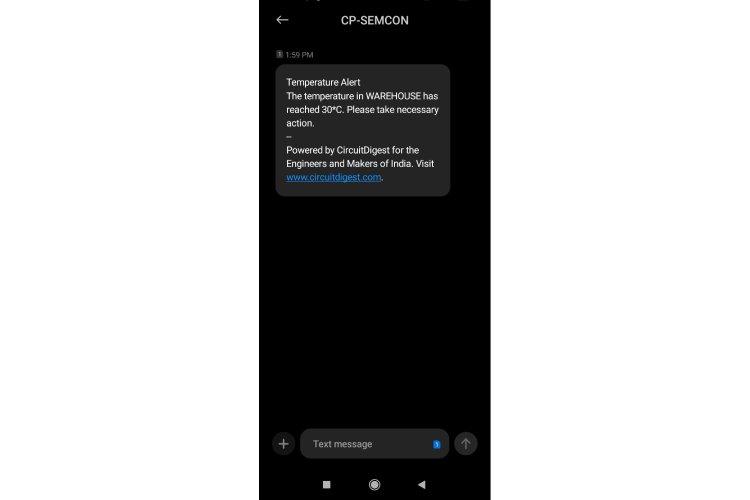
So, let's take a note on Template ID number 102, which is needed in the upcoming ESP32 programming part. In the above temperature template, you may notice two “#var#”, which are user customizable.
For example, if I initialize the global var1 & var2 variables present in the upcoming ESP32 code as “WAREHOUSE” and “30” respectively. The SMS alert should look like this while receiving.
Arduino Code Overview
Before diving into an in-depth explanation of the code, let’s get to know the core logic behind this C++ code. This code makes the ESP32 look for an authorized Wi-Fi access point and make a connection using the credentials. Later, it initializes the DHT11 temperature sensor to retrieve Temperature data continuously.
If the temperature value reaches 30 degrees Celsius or above, it triggers ESP32 to send an SMS alert using the SMS API. Ok, I hope, now you get a clear idea. Let’s move into the coding part.
Header Files:
#include <WiFi.h>
#include <DHT.h>
#include <DHT_U.h>
Here,
WiFi.h - It is the ESP32 board’s specific WiFi Library used for handling WiFi-specific tasks such as connecting to the authorized network and making HTTP request to the client via WiFi.
DHT.h && DHT_U.h - It helps in simplifying the process of making ESP32 communicate with the DHT11 through the sensor’s proprietary one-wire protocol.
Note, we don’t want to install the “WiFi.h” separately as we do for “DHT.h”, Since it already comes when we install the ESP32 board from the Arduino Board library manager.
Whereas you can easily get the “DHT11 Sensor” library by clicking its header file name, as I mentioned above. After downloading the ZIP file from the GitHub repo, you can install it either through the Arduino IDE, by going to Sketch -> Include Library -> Add ZIP Library and selecting the downloaded ZIP file, or by simply extracting the ZIP file into the Arduino library folder.
Macro for Pin Definition:
#define Temp_SensorPin 23Here, I am using a Macro to define in ESP32s, which pin the DHT11 sensor’s data pin is going to get connected. We can also use a variable to hold this data, but it is good to use macros over a variable to save some memory space, especially in embedded systems.
Creating an Instance of DHT_Unified Class:
DHT_Unified dht(Temp_SensorPin, DHT11);
This creates an object named “dht” for the “DHT_Unified” class to initialize the DHT11 sensor for getting temperature, where it passes the “Temp_SensorPin” macro value as a parameter, so that ESP32 can retrieve data from that specific pin.
Declaring Global Variables for holding valuable Data
// WiFi credentials
const char *ssid = "Semicon Media";   // Your network SSID (from arduino_secrets.h)
const char *password = "xxxxxxxxxx";   // Your network password (from arduino_secrets.h)
These “ssid” and “password” variables are used for storing the WiFi access point credentials, where the ESP32 is going to get connect to it.
// API credentials and SMS details
const char* apiKey = "xxxxxxxxxxxxx"; // Replace with your API key
const char* templateID = "102"; // Replace with your template ID
const char* mobileNumber = "91xxxxxxxxxx"; // Replace with the recipient's mobile number with country code (eg : 91XXXXXXXXXX)
const char* var1 = "WAREHOUSE"; // Replace with your custom variable
const char* var2 = "30"; // Replace with your custom variable
The above variables are used for holding the SMS API credentials, the recipient's mobile number, as well as the SMS template ID and customizable variables. Make sure you replace “apikey” with your newly generated one.
Here I am initializing “var1” and “var2” values as “WAREHOUSE” and “30”, which will get reflected on the final sms output as I mentioned previously.
float temperature = 0.0;This variable is used for storing the temperature data that comes from the DHT11 sensor. Here, I initially set it down to zero to avoid holding garbage data.
read_temperature() Function to retrieve Temperature data:
//Functiom to read the temperature data from the DHT11 sensor
void read_temperature(){
   sensors_event_t event;
   dht.temperature().getEvent(&event);
   temperature = event.temperature;
   Serial.println(temperature);
    delay(200);
}
This function is used for reading the current temperature data from the DHT11 sensor using its predefined functions and stores that value in the “temperature” variable. Then make it print on the Serial monitor as well for debugging purposes.
sensSMS() function to trigger SMS Alert via SMS API:
void sendSMS() {
 if (WiFi.status() == WL_CONNECTED) {
   WiFiClient client; // Initialize WiFi client
   String apiUrl = "/send_sms?ID=" + String(templateID);
   Serial.print("Connecting to server...");
   if (client.connect("www.circuitdigest.cloud", 80)) { // Connect to the server
     Serial.println("connected!");
     // Create the HTTP POST request
     String payload = "{\"mobiles\":\"" + String(mobileNumber) +
                      "\",\"var1\":\"" + String(var1) +
                      "\",\"var2\":\"" + String(var2) + "\"}";
     // Send HTTP request headers
     client.println("POST " + apiUrl + " HTTP/1.1");
     client.println("Host: www.circuitdigest.cloud");
     client.println("Authorization: " + String(apiKey));
     client.println("Content-Type: application/json");
     client.println("Content-Length: " + String(payload.length()));
     client.println(); // End of headers
     client.println(payload); // Send the JSON payload
     // Wait for the response
     int responseCode = -1; // Variable to store HTTP response code
     while (client.connected() || client.available()) {
       if (client.available()) {
         String line = client.readStringUntil('\n'); // Read a line from the response
         Serial.println(line); // Print the response line (for debugging)
         // Check for the HTTP response code
         if (line.startsWith("HTTP/")) {
           responseCode = line.substring(9, 12).toInt(); // Extract response code (e.g., 200, 404)
           Serial.print("HTTP Response Code: ");
           Serial.println(responseCode);
         }
         // Stop reading headers once we reach an empty line
         if (line == "\r") {
           break;
         }
       }
     }
     // Check response
     if (responseCode == 200) {
       Serial.println("SMS sent successfully!");
     } else {
       Serial.print("Failed to send SMS. Error code: ");
       Serial.println(responseCode);
     }
     client.stop(); // Disconnect from the server
   } else {
     Serial.println("Connection to server failed!");
   }
 } else {
   Serial.println("WiFi not connected!");
 }
}
This SMS function is specifically designed to send an SMS Alert when it is called by other functions. First, it checks whether the Wi-Fi is connected or not, then creates a Wi-Fi client to establish a connection with the server.
Later, it constructs an HTTP POST request with the necessary headers and JSON payload containing the SMS details. After sending the request, it waits for the server’s response code to determine the SMS sent status.
setup() Function
void setup() {
 // put your setup code here, to run once:
 Serial.begin(9600);
  // We start by connecting to a WiFi network
 Serial.println();
Serial.println("******************************************************");
 Serial.print("Connecting to ");
 Serial.println(ssid);
 WiFi.begin(ssid, password);
 while (WiFi.status() != WL_CONNECTED) {
   delay(500);
   Serial.print(".");
 }
 Serial.println("");
 Serial.println("WiFi connected");
 Serial.println("IP address: ");
 Serial.println(WiFi.localIP());
 dht.begin();
}
First of all, it makes the ESP32 connect to the existing WiFi network using its WiFi credentials, then it checks whether it connects to the network or not. If yes, it prints out the IP address of ESP32.
At last, it makes a call on dht.begin() to make the DHT11 sensor get ready for fetching the temperature data from the environment and send it out to the ESP32 input pin.
loop() Function
void loop() {
 read_temperature();
 if(temperature >= 30.00){
   sendSMS();
   //Stop sending further SMS alerts until the temperature gets back to 28
   while(temperature > 28){
     read_temperature();
   }
 }
}
This loop() function is used to continuously retrieve temperature data from the DHT11 sensor and check whether it is greater than or equal to 30 degrees Celsius. If yes, it triggers a One SMS alert and stops further SMS alerts until the temperature gets back to 28 degrees Celsius.
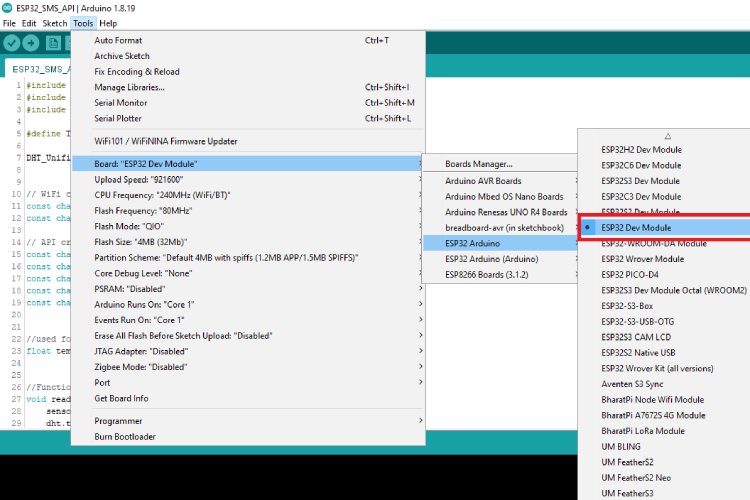
Uploading the Code
Ok, now the coding part is over, let’s delve into the code uploading part. For that, you make sure the ESP32 board is selected properly. Since there are many variants of ESP32-based development boards available, select the proper one based on your specific ESP32 development board.
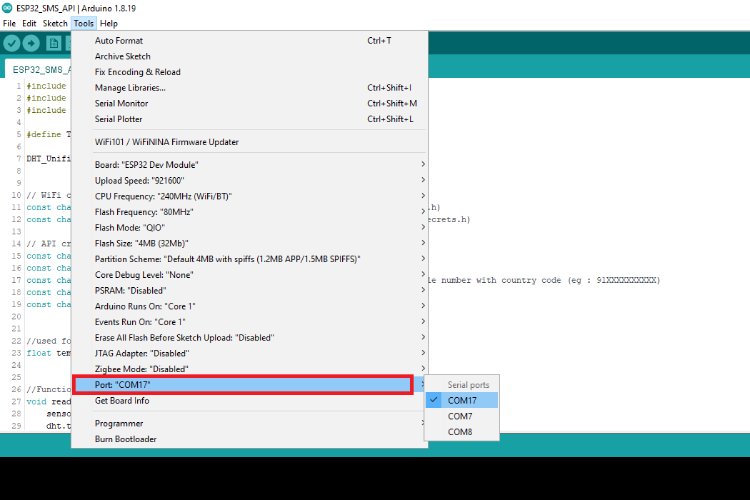
After that, make sure the Serial port of ESP32 is selected correctly in the Arduino IDE. Sometimes the port option is grayed out, which means the specific USB-UART driver is not installed in your System. Make sure it is installed.
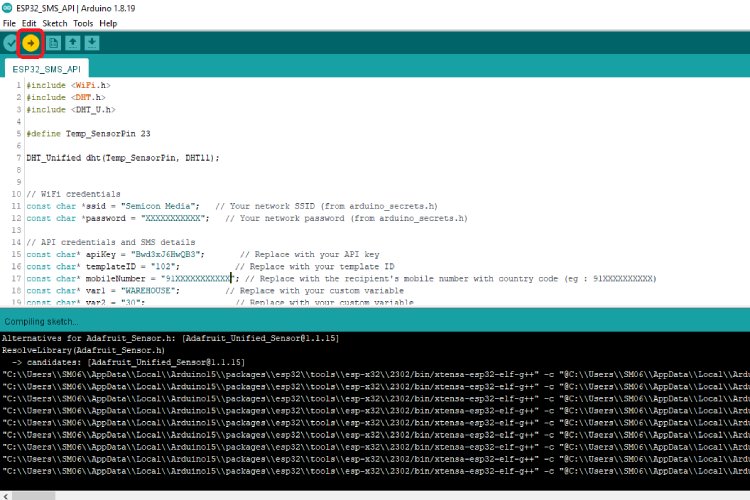
Finally, click on the upload button to dump the compiled code into your ESP32 Flash memory.
Working Demonstration
We are entering into the most exciting part, yeah!, You got it right, we are in the final testing phase to make our ESP32 send an SMS alert without the need of complex and costlier GSM Modules.
Let’s test it out,
Here you can find that ESP32 triggers the SMS alert to my phone when the temperature reaches 30 degrees Celsius.
GitHub Repository with Code and Circuit


Projects using Circuit Digest SMS API
Learn how to build IoT projects using Circuit Digest's free SMS API to send real-time alerts without a GSM module.

How to Send SMS from NodeMCU without Using GSM Module?
Learn how to send SMS alerts from NodeMCU using Wi-Fi and Circuit Digest’s free SMS API, without a GSM module. A simple and cost-effective solution for real-time IoT notifications.
")
Easily send SMS alerts from Arduino, ESP32, NodeMCU, or Raspberry Pi using Circuit Digest's free SMS API, no GSM module needed. Ideal for IoT and embedded projects in India.

How to Send SMS with Arduino UNO R4 via Internet?
Discover how to send SMS using Arduino via the internet with Circuit Digest’s free SMS API, no GSM module required. A smart way to enable real-time alerts in your projects.
GPS Visualizer to Upload Data and Visualize GPS Maps for Arduino, ESP32 & other Embedded Devices
Learn to visualize GPS data from devices like Arduino and ESP32 using CircuitDigest's GeoLinker API for real-time mapping and tracking.
How to build a simple GPS Tracker using ESP32 and Visualize Data on Map
Track GPS location using ESP32 and visualize real-time data on a map with CircuitDigest's GeoLinker API, no GSM module required.
Complete Project Code
#include <WiFi.h>
#include <DHT.h>
#include <DHT_U.h>
#define Temp_SensorPin 23
DHT_Unified dht(Temp_SensorPin, DHT11);

// WiFi credentials
const char *ssid = "Semicon Media";   // Your network SSID (from arduino_secrets.h)
const char *password = "XXXXXXXXXXX";   // Your network password (from arduino_secrets.h)
// API credentials and SMS details
const char* apiKey = "xxxxxxxxxxxx";       // Replace with your generated API key from Circuit Digest Cloud Website
const char* templateID = "102";           // Replace with your template ID
const char* mobileNumber = "91XXXXXXXXXXX"; // Replace with the recipient's mobile number with country code (eg : 91XXXXXXXXXX)
const char* var1 = "WAREHOUSE";         // Replace with your custom variable
const char* var2 = "30";                  // Replace with your custom variable

//used for storing the temperature data
float temperature = 0.0;

//Functiom to read the temperature data from the DHT11 sensor
void read_temperature(){
   sensors_event_t event;
   dht.temperature().getEvent(&event);
   temperature = event.temperature;
   Serial.println(temperature);
}

void sendSMS() {
 if (WiFi.status() == WL_CONNECTED) {
   WiFiClient client; // Initialize WiFi client

   String apiUrl = "/send_sms?ID=" + String(templateID);
   Serial.print("Connecting to server...");
   if (client.connect("www.circuitdigest.cloud", 80)) { // Connect to the server
     Serial.println("connected!");
     // Create the HTTP POST request
     String payload = "{\"mobiles\":\"" + String(mobileNumber) +
                      "\",\"var1\":\"" + String(var1) +
                      "\",\"var2\":\"" + String(var2) + "\"}";
     // Send HTTP request headers
     client.println("POST " + apiUrl + " HTTP/1.1");
     client.println("Host: www.circuitdigest.cloud");
     client.println("Authorization: " + String(apiKey));
     client.println("Content-Type: application/json");
     client.println("Content-Length: " + String(payload.length()));
     client.println(); // End of headers
     client.println(payload); // Send the JSON payload
     // Wait for the response
     int responseCode = -1; // Variable to store HTTP response code
     while (client.connected() || client.available()) {
       if (client.available()) {
         String line = client.readStringUntil('\n'); // Read a line from the response
         Serial.println(line); // Print the response line (for debugging)
         // Check for the HTTP response code
         if (line.startsWith("HTTP/")) {
           responseCode = line.substring(9, 12).toInt(); // Extract response code (e.g., 200, 404)
           Serial.print("HTTP Response Code: ");
           Serial.println(responseCode);
         }
         // Stop reading headers once we reach an empty line
         if (line == "\r") {
           break;
         }
       }
     }

     // Check response
     if (responseCode == 200) {
       Serial.println("SMS sent successfully!");
     } else {
       Serial.print("Failed to send SMS. Error code: ");
       Serial.println(responseCode);
     }


     client.stop(); // Disconnect from the server
   } else {
     Serial.println("Connection to server failed!");
   }
 } else {
   Serial.println("WiFi not connected!");
 }
}


void setup() {
 // put your setup code here, to run once:
 Serial.begin(9600);
  // We start by connecting to a WiFi network
 Serial.println();
 Serial.println("******************************************************");
 Serial.print("Connecting to ");
 Serial.println(ssid);
 WiFi.begin(ssid, password);
 while (WiFi.status() != WL_CONNECTED) {
   delay(500);
   Serial.print(".");
 }
 Serial.println("");
 Serial.println("WiFi connected");
 Serial.println("IP address: ");
 Serial.println(WiFi.localIP());
 dht.begin();
}
void loop() {
 read_temperature();
 if(temperature >= 30.00){
   sendSMS();
   //Make it to stop sending further SMS alert until temperature get back to 28
   while(temperature > 28){
     read_temperature();
   }
 }
}