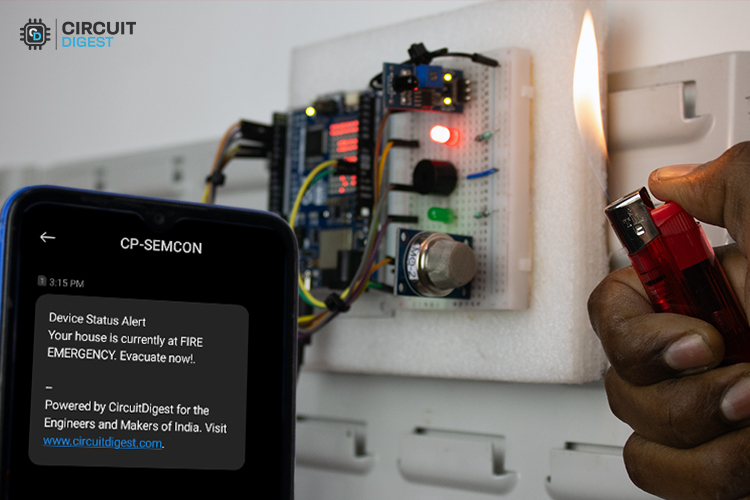
What if you could get an instant SMS alert the moment a fire or smoke is detected at home or office? Through this project tutorial, you can build a fire and smoke alarm system using Arduino UNO R4 that sends real-time SMS notifications. This means you will immediately get alerted even if you are far away.
In this Arduino Project, you will also learn how to build an Arduino smoke alarm that sends SMS Alerts without needing to rely on the GSM module. The Arduino UNO R4 will detect fire or smoke using the specific sensors and trigger the SMS alert to the authorized person’s mobile number. It is a simple, low-cost way to improve safety in your house or office. You can also check out our other IoT-based projects if you are interested. That being said, let's dive into this project
How does a Fire & Smoke Alarm System Work?
You might wonder how this fire and smoke alarm system with SMS notification works when it detects fire or smoke without a GSM module? The secret lies behind the communication between Arduino and Cloud APIs. Let’s see how it works in-depth.
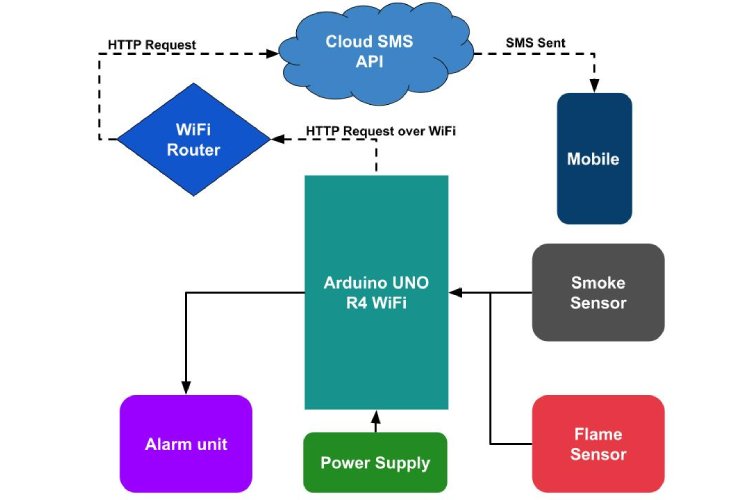
Arduino connects to the WiFi Hotspot - First of all, Arduino makes it connect to the existing WiFi network using wifi credentials. So that Arduino is able to communicate with the cloud SMS APIs for sending SMS Alerts.
Fire and Smoke Detection - The sensors used with the Arduino are responsible for continuously monitoring the surroundings to detect Fire or smoke. When it detects, it immediately sends a signal to Arduino.
Arduino Triggers the Alert - After getting a fire and smoke signal from the sensors, without delay, it starts to trigger both the Alarm unit as well as the SMS alert. For an SMS alert, it sends an HTTP Request to the Cloud SMS API, which contains a recipient phone number and alert message.
Delivery of SMS from SMS API - After receiving an HTTP Request to send SMS to a specific mobile number. It sends that SMS through its mobile network. This makes the Arduino send SMS, even though it doesn't use any GSM modules at all.
Here, to send SMS alerts, I am using the Circuit Digest Cloud SMS APIs, which are known for being fast, reliable, and completely free of cost. You can explore the API Documentation of this SMS API to understand how to use it.
Let's make sure you follow the Simple process to generate your SMS API Key, which is needed in the following tutorial, especially for the programming part.
Components Required
I hope you understand the working of the Fire and Smoke Detector System with SMS Alerts. Now it’s time to prepare a components checklist for purchasing the components from the nearby electronics shops. Here are the things needed for making a DIY Fire and Smoke Alarm System.
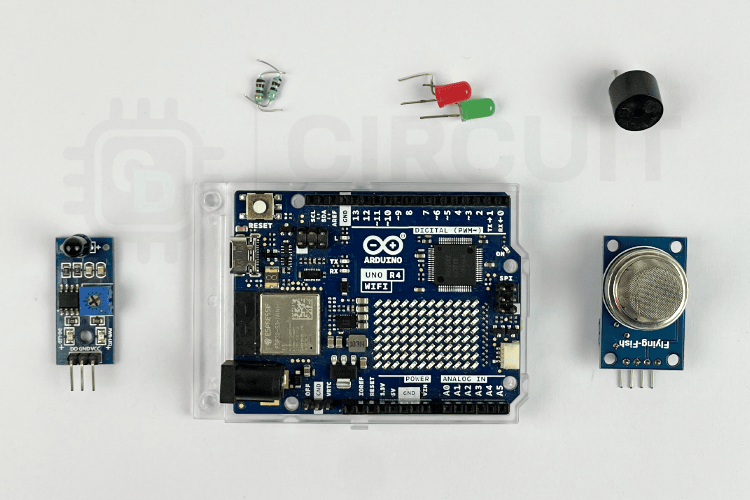
Arduino UNO R4 WiFi Development Board
Flame Sensor
MQ2 Smoke Sensor
5V Active Buzzer
Red and Green LEDs
220-ohm resistors
Breadboard
Connecting Wires
Circuit Diagram
This circuit diagram illustrates a fire and smoke detection system using an Arduino UNO R4 WiFi, MQ2 smoke sensor, and a flame sensor (fire sensor). The Arduino is the central controller that receives input from the MQ2 and flame sensors, then activates an alarm system composed of a buzzer, red LED, and green LED depending on the detected conditions. The green LED indicates normal status, while the red LED and buzzer serve as warning indicators in case of fire or gas leak detection. The connections are made via a breadboard to allow for rapid prototyping and component testing. SMS.

The MQ2 gas sensor is designed to detect combustible gases such as LPG, butane, methane, alcohol, propane, hydrogen, and smoke. It has both analog (AO) and digital (DO) outputs. In this setup, the analog output (AO) is connected to the Arduino to provide varying voltage levels depending on the concentration of gas in the air. The flame sensor detects infrared light emitted by fire using a photodiode or IR receiver and is connected through its digital output to the Arduino. When the sensor detects a flame (based on IR radiation intensity), it sends a HIGH signal to the digital pin. The Arduino then processes these inputs and triggers the alarm system if the gas concentration or flame is above a certain threshold. This setup is ideal for home automation, industrial safety, IoT fire alert systems, and smart fire detection systems.
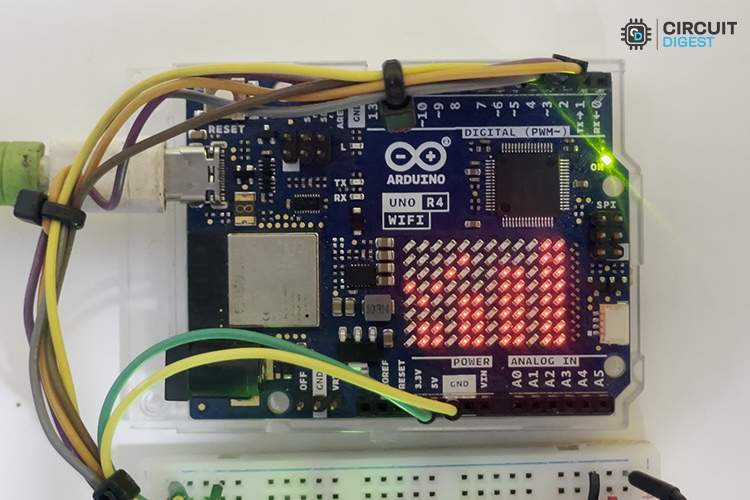
Let’s check out our actual hardware setup and wiring connection of the Fire and Smoke detector system.
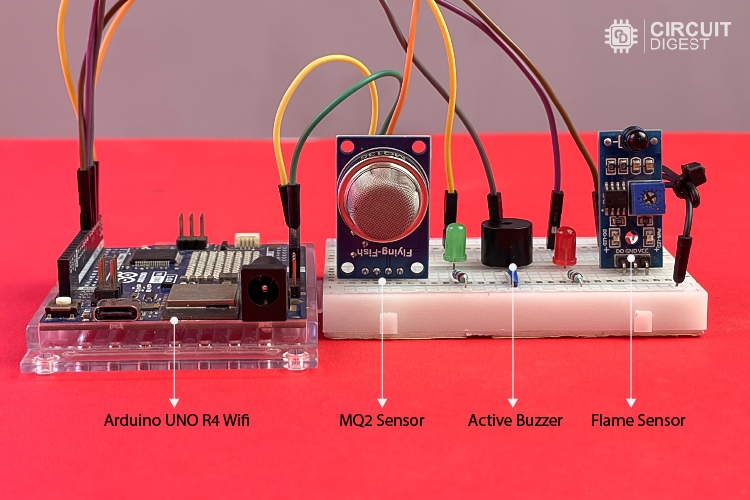
We can power the power supply either through its USB port or through the DC Power Jack connector. For simplicity, I decided to move on with a 5V USB power supply since it is easily available and helpful in serial debugging through its USB Port.
SMS Templates in Circuit Digest Cloud
Here is the list of prebuilt SMS Templates provided by the Circuit Digest SMS API, where each SMS template is designed for a specific practical application.
Due to these predefined SMS Templates, the possibilities of sending spam messages from this SMS API are nearly zero. This means that API misuse and bandwidth drop of the API server are greatly avoided.
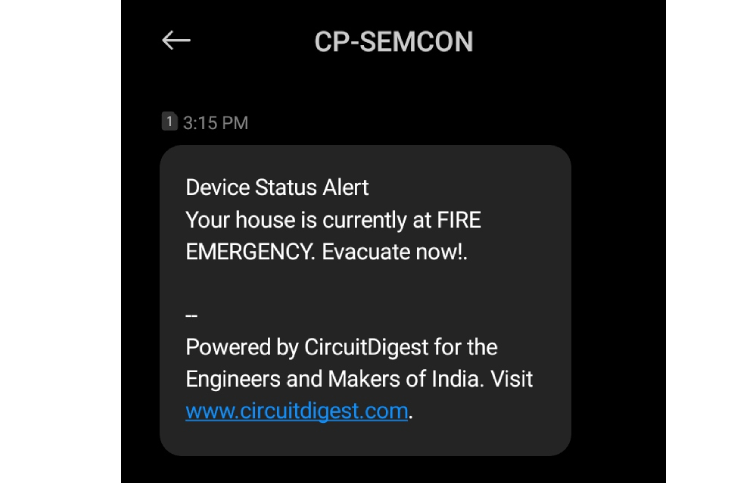
Since we are developing an “Arduino-based Smoke & Fire Alarm system with SMS Notification”. For that, I thought the “Device status Alert SMS Template with ID of 101” might be the right choice, as shown below.
In the above template, you can see the two “#var#”, which are user customizable, which means users can put their own message on it.
You can bring out your own message in place of “#var#” by initialising the custom messages to the global variables var1 and var2 present on this project code. For example, if I initialise the var1 to “house” and var2 to “FIRE EMERGENCY. Evacuate now!”. Then the SMS alert on the phone will look like this.
Arduino Smoke Detector Code
Code Overview
Before diving on to the actual code. Let’s understand the core logic behind this program. Basically, this program enables the Arduino UNO R4 to connect to an existing WiFi network, so it can send an SMS alert via API when the flame sensor or smoke sensors detects fire and smoke.
At the same time, it also triggers the onboard LED and buzzer for alarm purposes. It also keeps a check on Wi-Fi connectivity status. Suppose if it gets disconnected, the code will make it connect to the network automatically.
Including Headerfiles
#include "WiFiS3.h"
#include "Arduino_LED_Matrix.h"
Here, “WiFiS3.h” consists for predefined class-specific functions, which simplify the WiFi-specific process, like connecting to an existing WiFi Network and sending HTTP requests over the Internet.
Whereas, “Arduino_LED_Matrix.h” helps in bringing out different kinds of icons and animations on the onboard 12x8 LED Matrix to improve it’s user experience. Note, we don’t want to install these libraries individually, since they already come with an Arduino UNO R4 Board support package.
Arduino GPIO Pin Defining Macros
#define Smoke_sensor 2
#define Flame_sensor 6
#define Green_led 3
#define Red_led 5
#define Buzzer 4
Instead of using variables to hold GPIO Pin connection details of sensors, buzzer, LED..etc, here I used the #define macros to define GPIO Pins. The way of declaring the GPIO pins using Macros is more memory efficient than simply using variables.
Arduino LED Matrix Object creation
ArduinoLEDMatrix matrix; Here I am creating a new object from the ArduinoLEDMatrix class, to use the ArduinoLEDMatrix class's specific pre built functions to bring out the animation and icons on the Arduino UNO’s onboard LED Matrix.
Global Variables for Holding Credentials and Data
/* --------------------- WiFi Credentials and WiFi status ----------------*/
const char *ssid = "Semicon Media";      //Your WiFi Router SSID
const char *password = "xxxxxxxxxxxx";   // Your WiFi Router password
int status = WL_IDLE_STATUS;             // Connection status
The above global variables are used for storing the WiFi Hotspot Credentials, so that Arduino can make use of them to connect to the WiFi network. The status variable is used for storing the WiFi connectivity status.
/* ---------------------- API credentials and SMS Details ---------------------- */
const char* apiKey = "xxxxxxxxxxx";          // Replace with your API key
const char* templateID = "101";           // Replace with your template ID
const char* mobileNumber = "91xxxxxxxxxxxx"; // Replace with the recipient's mobile number with country code (eg : 91XXXXXXXXXX)
const char* var1 = "house";   // Replace with your custom variable
const char* var2 = "FIRE EMERGENCY. Evacuate now!";          // Replace with your custom variable
These variables hold the SMS API Credentials like apiKey, SMS template ID, recipient mobile number as well as the user customizable SMS template variables. Here, make sure you replace the API key with your previously generated API, and don’t forget to update the recipient's mobile number too.
If you still haven’t generated api, just follow these simple steps to get an SMS API key within a matter of seconds.
/* ---------------------- Network Led icons ---------------------- */
const uint32_t network_connect_icon[] = { 0x308311, 0xba1b4db0, 0xdb6db6db };
const uint32_t network_disconnect_icon[] = { 0x3003a1, 0xb41badb0, 0xdb6db6db };
network_connect_icon[] and network_disconnect_icon[] hold the bitmap data for the 12x8 LED matrix to bring out the network connected status and network disconnected status icon on it.
/* ---------------------- Network connection animation ---------------------- */
const uint32_t wifi_connection_anime[][4] = {
 { 0x0, 0x0, 0x0, 600 },
 { 0x0, 0x0, 0x600600, 600 },
 { 0x0, 0xc00, 0xc06c06c0, 600 },
 { 0x1, 0x80180d80, 0xd86d86d8, 600 },
 { 0x300301, 0xb01b0db0, 0xdb6db6db, 660}
};
This two-dimensional array is used for holding the bitmap sequence of the LED Matrix display to bring out the network connection animation.
/* ---------------------- Sensor Ststus Variables ---------------------- */
bool flame_status = false;
bool smoke_status = true;
These status variables are used for holding the sensor status, like flame detection status and smoke detection status.
WiFi Connect Function
/* --------------------------- WiFi connect Function --------------------------- */
void wifi_connect(){
 if (WiFi.status() == WL_NO_MODULE) {
   Serial.println("Communication with WiFi module failed!");
   matrix.loadFrame(network_disconnect_icon);
   while (true);
 }
 Serial.print("Connecting to WiFi...");
 matrix.loadSequence(network_connection_anime);
 matrix.play(true);
 delay(6000);
 while (WiFi.begin(ssid, password) != WL_CONNECTED) {
   Serial.print(".");
   delay(1000);
 }
 matrix.loadFrame(network_connect_icon);
 Serial.println("\nConnected to WiFi!");
 Serial.print("IP Address: ");
 Serial.println(WiFi.localIP());
}
This function is responsible for making Arduino connect to the authorized Wi-Fi hotspot using its Wi-Fi credentials. While trying to connect to the network, it will bring out the network connecting animation.
After successfully getting connected to the Wi-Fi network, it will bring out the stable Network connected image on the LED Matrix.
WiFi Reconnect Function
/* ------------------------ WiFi reconnect Function ----------------------------- */
void wifi_reconnect(){
   Serial.println("Wifi Reconnecting........");
   matrix.loadFrame(network_disconnect_icon);
   delay(6000);
   wifi_connect();
}
If the Arduino gets disconnected from the wifi hotspot, it uses this function to reconnect to the network. After the call of this function, it will bring out the WiFi disconnected symbol on the led matrix for six seconds.
Later it makes a call on the wifi_connect() function to get connected to the Internet.
Fire and Smoke Detect Function
/* ------------------------ Fire & Smoke detect Function ------------------------- */
bool fire_smoke_detect(){
 flame_status = digitalRead(Flame_sensor);
 smoke_status = digitalRead(Smoke_sensor);
 if(!flame_status || !smoke_status){
     return true;
 }
 else{
    return false;
 }
}
This fire and smoke detection function is used to continuously track the fire and smoke sensor status. If the fire or smoke is detected by any of the sensors, it will return “true” else it will return “false” to its calling function.
SMS Alert trigger Function
/* ------------------------ SMS Trigger Function ---------------------------------- */
void trigger_SMS(){
  if (WiFi.status() == WL_CONNECTED) {
   WiFiClient client; // Initialize WiFi client
   String apiUrl = "/send_sms?ID=" + String(templateID);
   Serial.print("Connecting to server...");
   if (client.connect("www.circuitdigest.cloud", 80)) { // Connect to the server
     Serial.println("connected!");
     // Create the HTTP POST request
     String payload = "{\"mobiles\":\"" + String(mobileNumber) +
                      "\",\"var1\":\"" + String(var1) +
                      "\",\"var2\":\"" + String(var2) + "\"}";
     // Send HTTP request headers
     client.println("POST " + apiUrl + " HTTP/1.1");
     client.println("Host: www.circuitdigest.cloud");
     client.println("Authorization: " + String(apiKey));
     client.println("Content-Type: application/json");
     client.println("Content-Length: " + String(payload.length()));
     client.println(); // End of headers
     client.println(payload); // Send the JSON payload
     // Wait for the response
     int responseCode = -1; // Variable to store HTTP response code
     while (client.connected() || client.available()) {
       if (client.available()) {
         String line = client.readStringUntil('\n'); // Read a line from the response
         Serial.println(line); // Print the response line (for debugging)
         // Check for the HTTP response code
         if (line.startsWith("HTTP/")) {
           responseCode = line.substring(9, 12).toInt(); // Extract response code (e.g., 200, 404)
           Serial.print("HTTP Response Code: ");
           Serial.println(responseCode);
         }
         // Stop reading headers once we reach an empty line
         if (line == "\r") {
           break;
         }
       }
     }
     // Check response
     if (responseCode == 200) {
       Serial.println("SMS sent successfully!");
     } else {
       Serial.print("Failed to send SMS. Error code: ");
       Serial.println(responseCode);
     }
     client.stop(); // Disconnect from the server
   } else {
     Serial.println("Connection to server failed!");
   }
 } else {
   Serial.println("WiFi not connected!");
 }
}
The SMS trigger function is used to send an SMS alert to the recipient’s mobile number using the predefined SMS templates. Here is how it utilises the Cloud API to send SMS It uses the WiFiClient for HTTP communication and sends a JSON payload using the HTTP POST method.
After that, it extracts the HTTP response code for status verification and properly disconnects from the cloud API client.
Alarm Trigger Function
/* -------------------------- Alarm Trigger Function ----------------------------- */
void trigger_Alarm(){
   static unsigned long prevmillis = 0;
   static bool buzzer_state = false;
   const unsigned long beep_interval = 100;
    digitalWrite(Red_led, HIGH);
    digitalWrite(Green_led, LOW);
    //Buzzer Beep Rate
    if(millis() - prevmillis >= beep_interval){
       prevmillis = millis();
       buzzer_state = !buzzer_state;
       digitalWrite(Buzzer, buzzer_state);
    }
}
The alarm trigger function is used to trigger the buzzer with non-blocking beep rate adjust control and also make the status LEDs glow.
Setup Function
/* ------------------------- Setup Function --------------------------------*/
void setup() {
   //Initialize serial and wait for port to open:
 Serial.begin(9600);
 while (!Serial);
 matrix.begin();
 wifi_connect();
 pinMode(Smoke_sensor, INPUT);
 pinMode(Flame_sensor, INPUT);
 pinMode(Green_led, OUTPUT);
 pinMode(Red_led, OUTPUT);
 pinMode(Buzzer, OUTPUT);
 digitalWrite(Green_led, HIGH);
 digitalWrite(Red_led, LOW);
 digitalWrite(Buzzer, LOW);
}
Here, the setup function is responsible for initializing the serial monitor, the onboard LED matrix, and making the Arduino connect to the Wi-Fi network. After that, it makes sure the Red LED and Buzzer remain off in the initial stage.
Loop Function
/* ---------------------------- Loop Function ---------------------------------- */
void loop() {
   if(WiFi.status() != WL_CONNECTED){
       wifi_reconnect();
   }
  if(fire_smoke_detect() == true){
      trigger_SMS();
      while(1){
         trigger_Alarm();
      }
  }
}
Here is our main loop function, which is responsible for continuously checking whether fire or smoke is detected or not. If it gets detected by sensors, it will trigger the Fire Emergency SMS alert to the recipient’s mobile phone.
After that, it keeps on triggering the Buzzer alarm to alert individuals in the house. This alarm gets stopped only after a hard reset of the Arduino UNO board.

Uploading code into Arduino
Let’s get to see the above program working in action; for that, we need to flash the compiled code into Arduino’s flash memory.
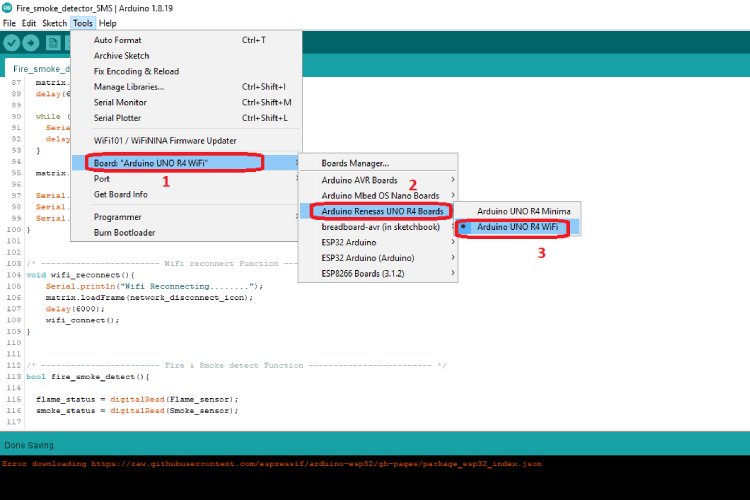
Before flashing the code, we want to make sure the “Arduino UNO R4 WiFi Board” is properly selected in the Arduino IDE as shown below.
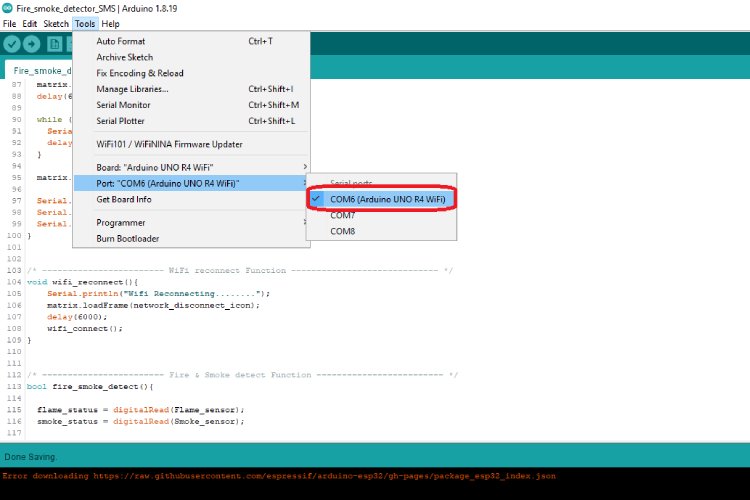
After selecting the board port properly, next we want to make sure our Arduino board is showing on the Arduino IDE’s port section. If it is shown, select it. So that we can be able to program it.
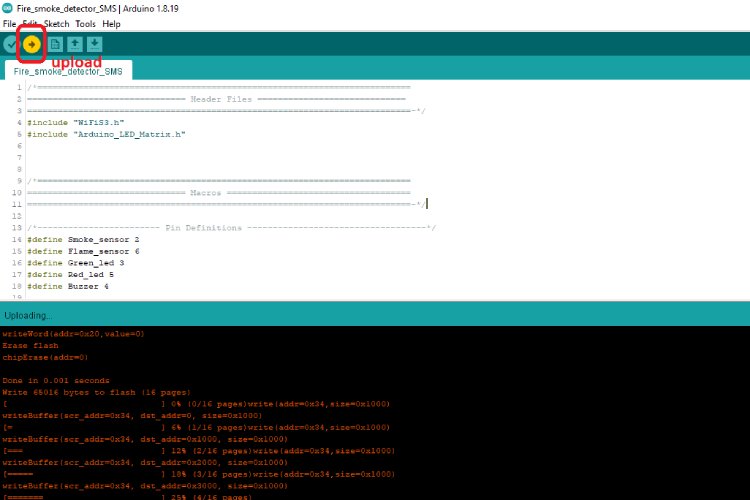
Finally, click the upload button to flash the code into the Arduino IDE’s flash memory.
Final Check and System Testing
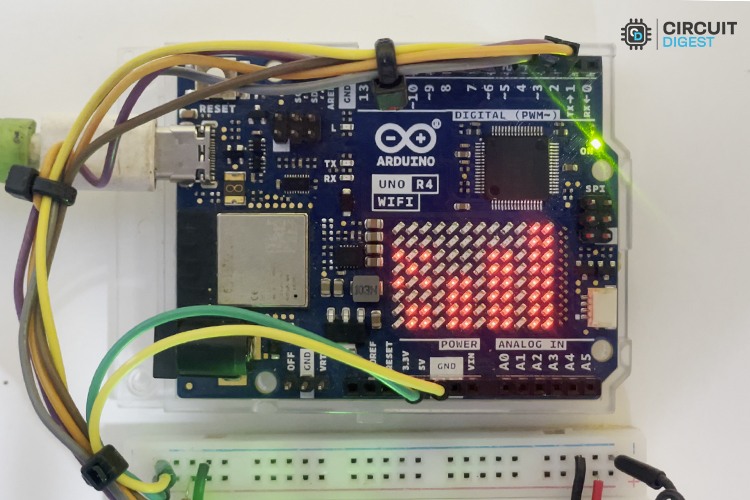
After the program flash, the Arduino UNO R4 WiFI tries to connect to the existing WiFi network using WiFi credentials. While it’s trying to connect to the network, it will bring out the “Network connecting animation” on its onboard LED Matrix as shown below.
After successfully connecting to the WiFi network, it will display the “Network Connected Symbol” on the LED matrix to give a visual feedback to the user for get to know the WiFi network status as shown here.
Next, our Arduino starts to monitor the fire and smoke status by continuously retrieving the data from the Fire and smoke sensor. If any one of the sensors gets triggered, it will send an SMS Alert to the authorized mobile number instantly as well as trigger the Buzzer alarm with LED indication.
While working, there is a possibility of Wi-Fi disconnection due to a Wi-Fi router power outage. To indicate the Wi-Fi disconnection, it brings out the “Network Disconnection image” on the LED Matrix as represented below. Since Wi-Fi connectivity is crucial for sending SMS alerts.
Here is a complete working demonstration of our Fire and Smoke detector using Arduino with SMS Alert.
Working of Fire and Smoke Alarm System
GitHub Repository with Code and Circuit


Similar Fire and Smoke Detection Projects
These projects offer various approaches to fire and smoke detection using Arduino, ranging from basic alarms to advanced systems with IoT capabilities.

Interfacing Flame Sensor with Arduino
Learn how to interface a flame sensor with Arduino to build a simple fire alarm system that detects fire using infrared light and activates an alert through a buzzer and LED.

How Does MQ-2 Flammable Gas and Smoke Sensor Work with Arduino?
Explore how to interface the MQ2 gas sensor with Arduino to detect gases like LPG, smoke, and methane, and trigger alerts using LEDs and buzzers for safety applications.

IoT Based Forest Fire Detection System using Arduino and GSM Module
Build an IoT-based forest fire detection system using Arduino and a GSM module that monitors environmental conditions and sends SMS alerts when a fire is detected.

Interfacing Flame Sensor with Arduino to Build a Fire Alarm System
Explore how to interface a flame sensor with Arduino to detect fire and trigger visual and audio alerts, helping build a basic fire detection system for safety applications.

Simple Smoke Detector Alarm Circuit
Explore a simple smoke detector alarm circuit using a TGS 813 gas sensor that triggers a buzzer when smoke is detected, ideal for basic fire safety applications.
Complete Project Code
/*==================== Header Files =========================-*/
#include "WiFiS3.h"
#include "Arduino_LED_Matrix.h"
/*=====================Macros============================-*/
/*-------------------------------- Pin Definitions -------------------------------------------*/
#define Smoke_sensor 2
#define Flame_sensor 6
#define Green_led 3
#define Red_led 5
#define Buzzer 4
/*=================Object Instantiation ========================-*/
ArduinoLEDMatrix matrix;
/*=====================Global variables=======================-*/
/* --------------------- WiFi Credentials and WiFi status -----------------------------------*/
const char *ssid = "Semicon Media";      //Your WiFi Router SSID
const char *password = "xxxxxxxxxx";   // Your WiFi Router password
int status = WL_IDLE_STATUS;             // Connection status
/* ---------------------- API credentials and SMS Details ---------------------- */
const char* apiKey = "xxxxxxxxx";          // Replace with your API key
const char* templateID = "101";           // Replace with your template ID
const char* mobileNumber = "91xxxxxxxxxx"; // Replace with the recipient's mobile number with country code (eg : 91XXXXXXXXXX)
const char* var1 = "house";   // Replace with your custom variable
const char* var2 = "FIRE EMERGENCY. Evacuate now!";          // Replace with your custom variable
/* ---------------------- Network Led icons ---------------------- */
const uint32_t network_connect_icon[] = { 0x308311, 0xba1b4db0, 0xdb6db6db };
const uint32_t network_disconnect_icon[] = { 0x3003a1, 0xb41badb0, 0xdb6db6db };
/* ---------------------- Network connection animation ---------------------- */
const uint32_t network_connection_anime[][4] = {
 { 0x0, 0x0, 0x0, 600 },
    { 0x0, 0x0, 0x600600, 600 },
    { 0x0, 0xc00, 0xc06c06c0, 600 },
    { 0x1, 0x80180d80, 0xd86d86d8, 600 },
    { 0x300301, 0xb01b0db0, 0xdb6db6db, 660}
};
/* ---------------------- Sensor Ststus Variables ---------------------- */
bool flame_status = false;
bool smoke_status = true;
/*======================== User Defined Functions =============================-*/
/* --------------------------- WiFi connect Function --------------------------- */
void wifi_connect(){
 if (WiFi.status() == WL_NO_MODULE) {
   Serial.println("Communication with WiFi module failed!");
   matrix.loadFrame(network_disconnect_icon);
   while (true);
 }
 Serial.print("Connecting to WiFi...");
 matrix.loadSequence(network_connection_anime);
 matrix.play(true);
 delay(6000);
 while (WiFi.begin(ssid, password) != WL_CONNECTED) {
   Serial.print(".");
   delay(1000);
 }
 matrix.loadFrame(network_connect_icon);

 Serial.println("\nConnected to WiFi!");
 Serial.print("IP Address: ");
 Serial.println(WiFi.localIP());
}
/* ------------------------ WiFi reconnect Function ----------------------------- */
void wifi_reconnect(){
   Serial.println("Wifi Reconnecting........");
   matrix.loadFrame(network_disconnect_icon);
   delay(6000);
   wifi_connect();
}
/* ------------------------ Fire & Smoke detect Function ------------------------- */
bool fire_smoke_detect(){
 flame_status = digitalRead(Flame_sensor);
 smoke_status = digitalRead(Smoke_sensor);
 if(!flame_status || !smoke_status){
     return true;
 }
 else{
    return false;
 }
}
/* ------------------------ SMS Trigger Function ---------------------------------- */
void trigger_SMS(){
  if (WiFi.status() == WL_CONNECTED) {
   WiFiClient client; // Initialize WiFi client

   String apiUrl = "/send_sms?ID=" + String(templateID);
   Serial.print("Connecting to server...");
   if (client.connect("www.circuitdigest.cloud", 80)) { // Connect to the server
     Serial.println("connected!");
     // Create the HTTP POST request
     String payload = "{\"mobiles\":\"" + String(mobileNumber) +
                      "\",\"var1\":\"" + String(var1) +
                      "\",\"var2\":\"" + String(var2) + "\"}";
     // Send HTTP request headers
     client.println("POST " + apiUrl + " HTTP/1.1");
     client.println("Host: www.circuitdigest.cloud");
     client.println("Authorization: " + String(apiKey));
     client.println("Content-Type: application/json");
     client.println("Content-Length: " + String(payload.length()));
     client.println(); // End of headers
     client.println(payload); // Send the JSON payload
     // Wait for the response
     int responseCode = -1; // Variable to store HTTP response code
     while (client.connected() || client.available()) {
       if (client.available()) {
         String line = client.readStringUntil('\n'); // Read a line from the response
         Serial.println(line); // Print the response line (for debugging)
         // Check for the HTTP response code
         if (line.startsWith("HTTP/")) {
           responseCode = line.substring(9, 12).toInt(); // Extract response code (e.g., 200, 404)
           Serial.print("HTTP Response Code: ");
           Serial.println(responseCode);
         }
         // Stop reading headers once we reach an empty line
         if (line == "\r") {
           break;
         }
       }
     }
     // Check response
     if (responseCode == 200) {
       Serial.println("SMS sent successfully!");
     } else {
       Serial.print("Failed to send SMS. Error code: ");
       Serial.println(responseCode);
     }
     client.stop(); // Disconnect from the server
   } else {
     Serial.println("Connection to server failed!");
   }
 } else {
   Serial.println("WiFi not connected!");
 }
}
/* -------------------------- Alarm Trigger Function ----------------------------- */
void trigger_Alarm(){
   static unsigned long prevmillis = 0;
   static bool buzzer_state = false;
   const unsigned long beep_interval = 100;
    digitalWrite(Red_led, HIGH);
    digitalWrite(Green_led, LOW);
    //Buzzer Beep Rate
    if(millis() - prevmillis >= beep_interval){
       prevmillis = millis();
       buzzer_state = !buzzer_state;
       digitalWrite(Buzzer, buzzer_state);
    }
}
/*=============================== Main Functions =============================-*/
/* ------------------------- Setup Function --------------------------------*/
void setup() {
   //Initialize serial and wait for port to open:
 Serial.begin(9600);
 while (!Serial);
 matrix.begin();
 wifi_connect();
 pinMode(Smoke_sensor, INPUT);
 pinMode(Flame_sensor, INPUT);
 pinMode(Green_led, OUTPUT);
 pinMode(Red_led, OUTPUT);
 pinMode(Buzzer, OUTPUT);
 digitalWrite(Green_led, HIGH);
 digitalWrite(Red_led, LOW);
 digitalWrite(Buzzer, LOW);
}
/* ---------------------------- Loop Function ---------------------------------- */
void loop() {
   if(WiFi.status() != WL_CONNECTED){
       wifi_reconnect();
   }
  if(fire_smoke_detect() == true){
      trigger_SMS();
      while(1){
         trigger_Alarm();
      }
  }
}