
This car parking assistant can protect your car from any damage while reverse parking. It indicates the distance of car from any object and raise an alarm when it reaches close to the wall or the object and needs to be stopped. This car parking sensor circuit is quite easy and uses few commonly available components which are listed below.
Required Components
- IC LM358 - 2
- 10k Resistor - 1
- 1k Resistor - 3
- 10k POT - 3
- 150 Ohm Resistor - 1
- Bread board - 1
- 9 Volt Battery - 1
- Battery Connector - 1
- LED - 3
- Buzzer - 1
- IR Pair - 1
LM358: LM358 is a Dual Low Noise Operational Amplifier which has Two Op-Amp in a single chip. This is a general purpose op amp which can be configured in many modes like comparator, summer, integrator, amplifier, differentiator, inverting mode, non- inverting mode and many more.
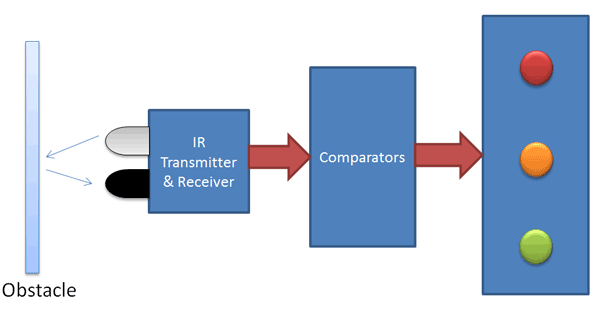
To design this car parking system circuit, we placed an IR transmitter receiver pair at the rear side of the car. IR transmitter transmits Infrared signal or rays into the environment continuously. When these transmitted IR rays reflect back to IR Receiver after striking on an obstacle, some voltage difference generates across this IR receiver LED. This generated voltage difference depending upon the power of IR rays that are reflected back to the receiver. More powered signal leads to more voltage difference. This voltage difference is used in our project to measure the distance. Here more voltage difference indicates the lesser distance from the object. Here we have shown distance from the obstacle by using three LED’s. Meaning of these LED’s are explained in working of this project.
Circuit Diagram and Explanation
In this car parking circuit we have used an IR pair for detecting obstacle and two LM358 Dual Comparator ICs for comparing voltages. Comparator configured in non-inverting mode and 10 K potentiometer is connected at its inverting terminal for adjusting reference voltage and IR receiver’s Output is directly connected at non-inverting pins of all comparators. One Red LED is connected at output of U1:B IC(LM358), a Yellow LED is connected at output pin of U2:A IC(LM358) and an Green LED is connected at output pin of U2:B IC(LM358) through a 1K resistor. A buzzer is also added at Red LED.

Working
We have shown the reference voltage and relative parameters in the below table. But one can set distance by changing the value of potentiometer.
Obstacle v/s Vehicle | LED status | Reference Voltage | Distance |
not close | All OFF | Greater than 15 cm | |
Close | Green ON | 2.0 Volt | About 15 cm |
More Close | Yellow ON | 4.0 Volt | About 10 cm |
More Close | Red ON | 6.0 Volt | About 5 cm |
Touch | Car Damaged | About 0 cm |
This system is placed at the rear of the car and sensor’s front side toward the obstacle (wall). Now suppose car is moving back toward the wall or obstacle in the parking slot. If distance between car and obstacle is more than 15 cm then no LED will glow. Now if car moves toward the obstacle and suppose greed light turned ON, it means car is about 15 cm away from the obstacle. Now car is moving more close toward the obstacle and yellow light appears or turned on it means car is about 10 cm away from the obstacle. Now car is moving closer toward the obstacle and red light appears it means car is about 5 cm away from the obstacle and same time buzzer start beeping. Buzzer and red light indicates that the car need to stop now otherwise car may be damaged.
Comments
The circuit is correct, you need to adjust the values of three potentiometers by rotating the knob, Rotate the knobs until LEDs get turned OFF, now take some object in front of IR pair, LEDs should get turned ON. Now you should set the sensitivity of three LEDs separately by rotating the respective knobs, like Green LED should be most sensitive and Red LED should be least sensitive.
How can we increase the sensing distance to about 75cm
75cm can be obtained from this circuit, otherwise provide LED the optimal(max) power supply or use convex lens at photodiode or use a powerfull IR LED. Also try using 100k variable resistor to this circuit.
We set circuit on the breadbord but we can not change volt for each led by potantiometer. How we can operate this circuit
I made it .but it works opposite.
Change the sensitivity for the LEDs by adjusting Potentiometers, with Green most sensitive. You can check this Circuit for clear understanding of IR sensor working: IR Sensor
I do not understand.
sir i do not understnd the circuit u have upload and original circuit
what problem are you facing?
In the circuit there are only 2 ICs shown but in the circiut diagram i can see 3 why is it so. Am i reading the diagram wrong
there is only two IC's are used.
here we have used LM358 which is dual op-amp IC.
mean single IC consists two op-amp inbuilt.
so here is four op-amp but we used three of them.
for more detial read data sheet of lm358.
yes. but in the schematic every single op-amp have its own 8 & 4 pin. so its 3 different ic's??
(sorry for bad english)
sir there you used 150ohm or 10 k resiston on recver diode and what is the specification of pot have used sir ?
I have been trying to get this circuit to work and it seems to work opposite, turns off when something is very close and on all the time. I adjusted the pots and it doesn't fix it. Also, the schematic is not correct for using a 150 Ohm resistor in the call out, it shows 2 10K. Can you please help me?
You must have messed up with the inverting and non inverting ends of op amps, you have connected terminal + connections to - terminal and vice versa. I recommend you to read about LM358, it is a dual opamp IC, in which we have used 2 opamps of one IC and 1 opamp of another IC, means we have used total 3 op amps out of 4 from 2 LM358 ICs. Please go through its datasheet and understand the working of an Op-amp IC.
Hi I bought aftermarket car parking sensor device
amazon.co.uk/CAR-Reverse-Parking-Display-Sensors/dp/B011K4PFW2
I install in front bumper. Too much noisy. I plan to reduce rage from 2 meter distance to 1 meter distance . any help that I can do something on the circuit board
Hi there! In the above circuit we have 1 Tx and 1 Rx sensor. Would be possible implement 2 or even 3 pairs of Rx/Tx?
Thanks in advance,
Jack
sir can u tell me what is the frequency range transmit from the transmitter via infarred led and voltage value? and also at that time reciver point voltage value is what? sir kindly tell me ? this is my final year project? and also there are non inverting pin also short sir?
Infrared Frequency range is about 300 GHz - 430 THz, and voltage at the Receiver may vary from 0 to 9v depending upon the closeness of object to the IR pair. Learn more about IR sensor here: IR Sensor Module Circuit
i cant see the pot in the circuit
Sir, thank you for the circuit and the explanation
I want to know if we could make the same circuit sound when each LED glows
yes, just connect more buzzers with other two LEDs, like the last one.
Can we use LM324 in place of two LM358.
Instead of IR pair can ultrasonic sensor be used?
Which would have better accuracy?
Maddy can you upload the maths calculations of how resistance you put at the potenciometers related with the voltage? Thank you
dear sir ;
i need to change distances green is 30cm , yellow is 15cm and red is 5cm it's possible .if it's possible please tell me about this,,,
thank you ;
v.s rao.
@David @vadlamudi: 10k pot is generally used with IR pair, you can use more or less according to the sensitivity range. And distance can be set manually by keep rotating the pot and check the LED at the same time. Also check this circuit to understand the IR Sensor Module Circuit
Thanxx Bro this ciruit is in working condition but it takes lot of hard work ..
"I have to try,all your instruction but very close not more 15cm.
Any solution to make more 50cm..thnk's
This question is already answered above. 50cm can be obtained from this circuit, otherwise provide LED the optimal(max) power supply or use convex lens at photodiode or use a powerfull IR LED. Also try using 100k variable resistor to this circuit.
It works at day light. but at night ,when the light is low it works very badly..
Sir , please help me..
We build the ckt & we got the same results thank you
150Ohm register is burning while operating the ckt we got the same results but as time pasing the ckt sensitivity is changing and 150 ohm register is burning please help us
What modification we have to do?
What power supply are you using, please use 9v general purpose battery as mentioned, it should not burn with 9v battery.
Yes We used 9v power supply but it is still burning as time passing & ckt sensitivity is changing as time passing for every trial we have to adjust the presets what should we do
Replace the 150 ohm resistor with 1k resistor and use some constant power supply like 5v adapter.
How can this concept be reversely operated as buzzer for long distance indication and no sound for short distance pls reply soon
Maddy ,,
What is the potentiometer value we want to keep for glowing the LED......
Sir I have did the project but not on bread board I did the project on general purpose circuit board..it came very well..sir I want u to see the model..
Sir
The buzzer is not working when I simulated it in Proteus. When I connected it in parallel with the LED, it stops working.
made it and its working perfectly.
We are glad that it worked for you.
We made it but the problem is IR pair is not work.plz help us what should we do?
sir
How we can detect the pole behind the left and right rear lights?
In which configuration we can use two other IR sensors for detecting the pole described above?
plz reply me as early as possible
is this circuit valid for 3 IR sensors?
All the nights glow during day time, but when at night, it works properly. What should we do? Thanks
sir, please can your send me the pcb design of this circuit.
Hello, does someone know about how long does the battery will last? Or can I power this circuit from my car battery?
This is a demo circuit for how Reverse parking sensors works, car battery may be over killing. But you can take power from Car phone charger outlet, then regulate it with USB car charger. Check this circuit PIC Based Car Battery Voltage Monitoring System
Hi, we made the exact circuit, and once the power supply is connected all the LED's are glowing, then by rotating each potentiometer knob all LEDs turned off. What to do next? how to set the sensitivity of each LEDs?
em expecting your reply soon, thank you! ^_^
Hello, we also made the exact circuit, but everytime we're connecting the power supply, the leds just keep on glowing. We tried turning the knobs of the trimmers but the glowing leds are still turned on. Please helppp. Thank you!
connection are correct but LED is not glowing. what should we do now?
how to connect the pots to the opamp?i am confused regarding the connections of pin 8 and pin 4
Can you please send me a clear picture off ur breadboard thanks
Can we use SM3388 as the reciever??
Hello sir, I have made the circuit as per the diagram. But all the LEDs are glowing together at 5 cm. The LEDs are not glowing at 10 and 15 cm. What should I do?
worked flawlessly thanks
sir y u put 3 ics in the circuit and on the breadboard only two?
Take a close look at the name of IC in circuit diagram. They are U1A and U2A and U2B.
This means that there are only two IC U1 and U2. Since LM358 is a dual package op-amp it has both U2A and U2B inside it. Similarly U1 also has A and B, but we have left U1B to be free
Hi
I've made the same circuit on proteas as well as on bread board but both of them aren't working.
Can I know how many people have made this and succeed? Because I am having a problem because the LED keeps turned on even though I already change the sensitivity on the pot. Can someone help me with this?
The circuit seems to be fair. So everyone should get it working as the author has demonstrated. If you facing any trouble its most likely with your connections. Use a multimeter to debug your circuit
what does the D5 do because i am lost on how the it can have the negative is connected to the positive
I made this project as my 5th semester project. The circuit was working good.
Thanks Sir .
@saqib Sami when i simulate this on proteus immediately i press play it =immediately displays a one instead of zero
what could be causing this ?
Bro. Can you please send me your mail id cause I want help in hardware part. Actually all 3 led are glowing when the circuit is on. What did you do to make it right!?
Bro. Can you please send me your mail id cause I want help in hardware part. Actually all 3 led are glowing when the circuit is on. What did you do to make it right!?
Bro. Can you please send me your mail id cause I want help in hardware part. Actually all 3 led are glowing when the circuit is on. What did you do to make it right!?
Bro. Can you please send me your mail id cause I want help in hardware part. Actually all 3 led are glowing when the circuit is on. What did you do to make it right!?
Any one of u have any idea about pcb of reverse car parking sensor plzzz guide me
hey guys what did you think its a correct circuit??? its not a correct circuit. he has used 2 ic's on bread board.while there are 3 ic's on proteus schematic format.
Hey! I am unable to make the circuit in Multisim. Can anyone send me the design either on Multisim or proteus for simulation??
Hi sir I am doing this project can you send me the full video of the building the circuit

we made the exact circuit on the bread board but we are not getting proper sensing through the ir pair we checked the ir pair its not faulty . when we place the power supply all the leds are glowing even if we remove the resistor all the leds are glowing what shall we do to make sure one led glows at a time and we get proper sensing